

Looking for a great, all-purpose tote bag? Make this one in just an hour or two! This free tote bag sewing pattern comes in 2 sizes, for you and a kid. It’s also reversible, so grab some fabric and get started on the simple tutorial!


Hey all! I’ve got a quick, fun bag tutorial for you today. These are seriously so easy and super addicting to make! While I’m usually all about making clothes for me and the rugrats, bags place a close second on my list of addicting projects. If I let myself, I could sew up more bags than a girl could ever use in a lifetime!
My aunt emailed me a while ago with pictures of a bag just like this that she bought on vacation. She said she used it all the time and was really hoping to recreate some at home for gifts. I was happy to help her figure it out and came up with this cute shopper tote. They’re perfect for the library, grocery store, soccer practice, ballet class – you name it! Plus the reversible factor just makes it that much more fun. In fact, I think I’ll whip some up for Halloween treat bags!
I’ve already made 5 of them…the 3 not pictured were sewn up in an annoying My Little Pony fabric that my girls INSISTED I buy. I’m such a sucker! I’ve included a downloadable pattern for the adult size I’m holding here and the kid size Kira has. My girls really loved the smaller size and I like to pack mine full of as much crap as possible.
FYI: The tutorial has LOTS of pictures…not because it’s hard but just because it’s easier that way! Ready??
Supplies
*Printed pattern (Download HERE, see instructions for printing below)
*Total of about 4 yards of quilting cotton: 2 yards of fabric for outside of bag PLUS another 2 yards for lining. (You’ll need considerably less than this if using 60″ fabric or making the small bag).
*coordinating thread
Instructions for printing pattern:
Download and open THIS PDF pattern using Adobe Acrobat or Reader (NOT in a browser!). On the left side of the program, you’ll see a symbol that looks like 3 pages stacked on top of each other. Click this symbol and choose which size tote you want to print. If you’re printing the SMALL bag, make sure the eyeball icon is visible next to the layer labeled SMALL and not visible next to the LARGE layer (and vice versa if printing the LARGE tote). If you have them both visible when you click print, it will look very confusing!
Make sure your printer is NOT set to “scale” or “fit to page”. You will need to print all 5 pages for the large tote, but only pages 1, 2 and 4 for the small tote. Double check the 1″ calibration box after printing to make sure your printer didn’t scale the pattern. Overlap the margins of each page, matching up the alphabetical squares on the edges and tape together. Cut out pattern.
Sewing Instructions

- Fold your fabric in half, place pattern on the fold line and cut out. You will need to cut out TWO pattern pieces of each fabric and TWO bottom rectangles (measurements on the pattern). You will have a total of FOUR tote pieces and TWO bottom pieces.
NOTE: If you’d like to add pockets, you can do that now! Simply cut out a rectangle or two of your preferred size, fold under the raw edges and topstitch the sides and bottom of the pocket to your tote pieces wherever your little heart desires!
2. Beginning with one fabric, lay your two tote pieces right sides together and sew ONLY along the side seams on both sides. Press your seam allowances open.
3. Take your bottom rectangle piece and fold it in half lengthwise to find the center of the short sides. Mark with pins.
4. With right sides together (RST), match this pin up with the side seam of your bag you sewed in step 2. Pin bottom and side seam together; repeat with opposite side.
5. Begin sewing tote and bottom together at side seam. Before you get to the first corner, clip both fabrics at a 45 degree angle, about 1/4″. This will ensure that your corners lie flat when bag is turned right side out.
6. When you get to 1/4″ from the corner of your bottom piece (where the slit is), leave the needle in the fabric, raise the presser foot and pivot your fabric so that you can continue sewing the two fabrics together. Continue this way, clipping each corner, until you return to where you started.
The bottom of your bag should look like this now.
7. Turn your bag right side out and press the bottom seams. Repeat steps 2-7 for the other (lining) fabric as well. 8. Turn one of your fabrics inside out again. Insert one tote into the other so that right sides are together.
NOTE: your top curves and straps are still unsewn at this point!
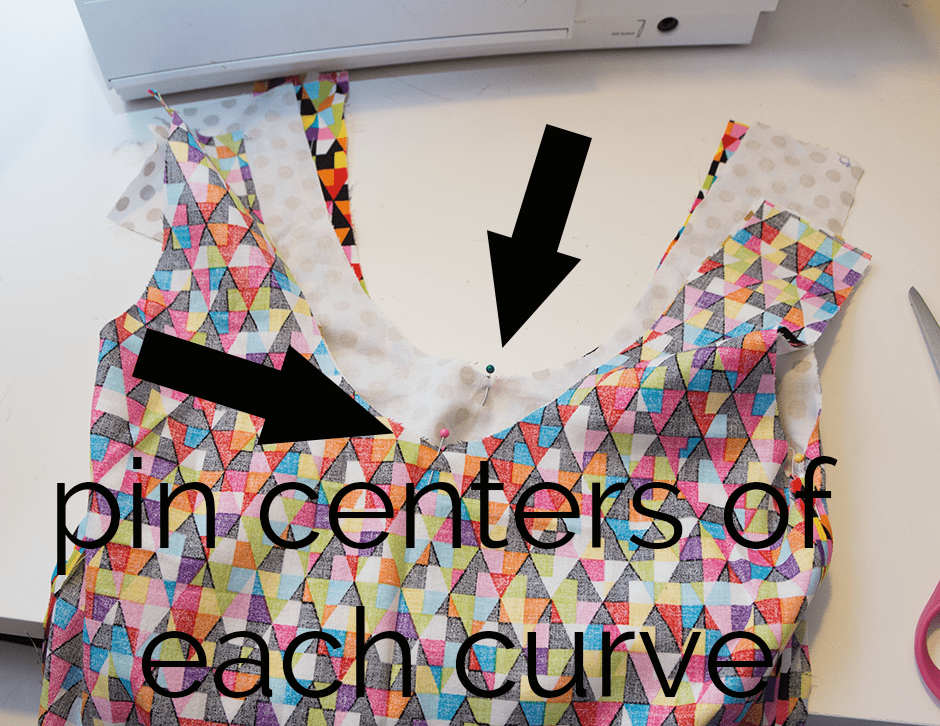
9. Pin the centers of each curve to the inside fabric. Beginning about 5 inches from the top of each strap, sew the outside fabric to the inside fabric. You will be sewing FOUR curves.
10. Clip each curve well. Turn bag right side out through an open strap.
11. Lay your bag flat with a side seam in front of you.
12. Fold one strap half over on top of the other half so that they match, RST. Sew these together, with a 1/4″ seam allowance. Repeat with the lining on this side, and both lining and exterior on the other strap. (Be sure to not twist the straps before sewing!) Press seams open.
13. Begin pressing your curves well and continue until you reach the raw edges of the straps. Fold these edges under 1/4″ and press well. Do this to all 4 curves and both straps.
14. Topstitch along all your curves and along the folded, pressed edges of your straps. This will close up your open edges and make the bag look nice and neat!
Now pack this baby full of stuff and have a ball!


6 Comments
Anne
September 29, 2016 at 8:13 amShopper totes for kids, too! I love it! I’ve got a Craft Gossip post scheduled for this afternoon that features your free pattern: http://sewing.craftgossip.com/?p=89891 –Anne
Free pattern: Reversible shopper tote in adult and kid sizes – Sewing
September 29, 2016 at 12:25 pm[…] DIY Reversible Shopper Tote, by Whisk ‘Em […]
Amana
October 25, 2016 at 3:19 pmGreat job
Jeannine
October 31, 2016 at 12:17 pmHi Bonnie…..I’ve printed the pattern and it’s the correct size. I understand how to tape together the pages for the SMALL size and use only pages #1,#2, and #4. I’m having trouble understanding the LARGE size. If I overlap and tape all 5 pages at L, R, and W, I’m confused about page #3……especially the top. Does the LARGE size wind up being about 7″ longer than the SMALL? …..and what about the width? Do I extend the side seam out to the edge of pages #3 and #5?
thanks for your help….the answer is probably right in front of me….I’m just not getting it 🙂
This looks like a great tote for my daughter, daughters in law, and grand daughters! Can’t wait to get started….
Bonnie
October 31, 2016 at 2:21 pmHi Jeannine!
Sorry about the trouble! Yes, you will use all 5 pages with #1 by itself at the top, 2 & 3 connected underneath that and 4 & 5 together at the bottom. Pages 3 & 5 have the side seam line on them…are you not seeing that? Page 3 also includes part of the tote strap curve at the top. Double check that your printed pages show exactly what the digital version does on your computer and it’s not just a printer error. If you’re still having trouble, email me at hello@bonnieandblithe.com!
Reversible Dress Pattern For Your Little Girl - Sewing Tutorial
September 27, 2018 at 2:46 pm[…] I have a thing for reversible sewing projects. Just check out this skirt and this bag…both cute projects that can be used on both sides! I just love the idea of getting twice the […]