


Holy cow, am I excited to finally share all the after pics of our kitchen! This project has been a LONG time coming and we are just thrilled with the end result. I got to dig up some old “before” pics for this post, along with a couple pictures of the kitchen as a work in progress over the years. Try to not get too overwhelmed by the heinousness that was our kitchen when we moved in almost 7 years ago.
Ready for this??

This was what greeted us when we first toured the house. Trust me, it was way worse in person. We painted and replaced carpet before moving in, but that was about it.

A bit of a difference, eh?? I honestly cannot believe that we lived in such a dungeon-like kitchen for so long.
The progress of the remodel went a little something like this:
Sticker shock from buying a new home kept us from doing any major work on the kitchen for about 2 years. I finally had had enough one day and decided that the dark (filthy) cabinets and the low ceiling were the biggest problems. One weekend, I tore off cabinet doors, picked out a light cheery aqua paint color and went to town.
I also decided to start knocking down ceiling drywall in order to speed along the process of raising the ceiling. You can read all about that tiny fiasco here and here.
The result of that (expensive and laborious) job ended up looking like this:

Much better than the original, granted, but still not all that functional. (What was with the 5 centimeters of counter space in the 1970’s??).
Finally, this winter we decided to start getting some quotes to tear down this wall separating the kitchen and living room. I had a couple contractors give me an estimate for a bare-bones remodel, including brand new cabinets, sink, faucet, demo of this existing wall and a large island to take its place. Oh, and I thought about moving the sink to said island as well.


Once we started getting bids back of $25,000 -$30,000, we realized that we were going to have to give up that dream of tearing out everything (Ok, ok, I was gonna have to give up that dream). Instead we started getting creative.
The pros to the original kitchen:
*sturdy cabinets (now in a pretty shade, if you ask me)
*decent size
*plenty of cabinet space (even if we tore out 1/3 of them)
The cons:
*very minimal natural light
*horribly ugly countertops that were falling apart
*a wall between the kitchen and dining table (I needed to know what was going on at the table while I was finishing up dinner)
*insufficient counter space

We ended up deciding that tearing out the upper half of the wall (and upper cabinets), building a bar and replacing countertops were in the budget and would give us the most bang for our buck.

Of course, as remodels are wont to do, it still went over budget but we were able to add a few other niceties that needed to be done and really added to the overall feel. These included a new (deeper!) sink and faucet (with a sprayer! Didn’t realize how much I was missing with my crappy old one), bar stools for the new bar, a new stove (our old one wouldn’t fit under the bar overhang), pendant lights, and a new island (with storage to make up for some of our missing cabinets).

A few other other interesting tidbits…
Cabinets cut in two: If you look closely at the above “before” pics, you’ll see that we had two really tall pantry cabinets flanking the counter space near the stove. In order to get the open feel that we wanted, these had to go, but we didn’t want the hassle of trying to find other matching lower cabinets. Luckily we had a pretty smart contractor who just hacked those tall ones in half and put the upper half on the ground, also extending our counter space. Best decision ever.
Pure white, laminate countertops: I would’ve loved stone counters but considering that we were putting them on top of 30 year old cabinets and that they would’ve added another $2K to the price tag, we decided laminate was good enough for us. We were also both a little nervous about them being stark white but I finally decided that very little in a house with 6 kids looks or stays clean for more than about 30 seconds. If I’m gonna be wiping my counters down 37 times a day anyway, I’d like them to look pristine when they’re done. So far, I absolutely love them.
Ikea Island: We really needed the prep space in the middle of a kitchen this wide and the drawers are an awesome bonus. I keep most of my spices, baking supplies, hand towels, ziplocs and plastic wrap, etc. plus all the kids cups, bowls and plates in this thing. It’s one of my favorite improvements.
The extra-high bar: Ideally I would’ve liked the bar to be lower but with the backsplash and my electrical outlets, 46″ was as low as we could go. At first I was nervous about the kids climbing up and down such high stools (which with 34″ seats were impossible to find, by the way!) but no accidents so far and we all LOVE that they can sit right there while I’m making meals. It makes breakfast and lunch prep SO much easier!! I had no idea what a difference that would make.
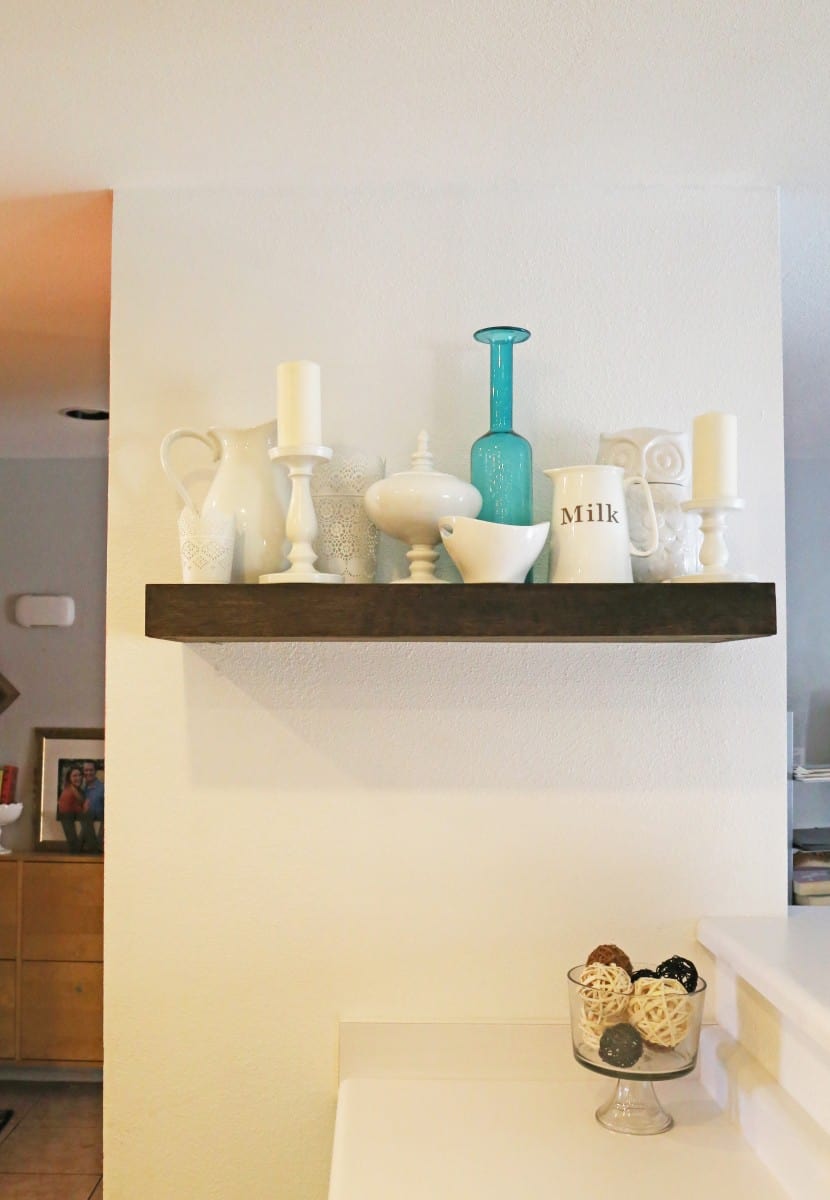
The wood shelf: I saw an awesome tutorial on how to make heavy duty floating shelves on this blog and couldn’t wait to try it. After attempting it myself, all I gotta say is, mad props to the wood workers. It was rough going getting everything to look just right but I’m pretty happy with the end result.

Lack of cabinets: Honestly, my cabinets were such a disorganized mess to begin with, I relished the chance to get rid of half the crap I had stored in there and pare everything down to essentials only. Besides the storage in the island, we did end up buying the white shelves next to the fridge so that we could keep pantry essentials close at hand. It’s worked out pretty well.

It’s certainly not a perfect kitchen, but overall we’re extremely happy with both the final result and the fact that it cost about one third less than what a total overhaul would have!
Hooray for making meal prep and clean up a little more bright!

Sources:
Ikea Island is part of their Varde kitchen systems. Not available online but check your local store.
White shelving unit
Pendant lights
Bar stools
Tutorial for hanging planters
All glassware from Target, HomeGoods or Ikea (planter behind sink from Anthropologie)
Pottery Barn Grand Phone found on Ebay
Faucet
Sink
5 Comments
Heidi
February 26, 2015 at 10:13 amOh Bonnie, it’s so light and airy, and beautiful!! I love the blue/aqua with the white, it looks amazing! And the hanging lights at the bar are my favorite!
Bonnie
March 1, 2015 at 4:13 amThanks girl! I seriously can’t believe how much more enjoyable it is to cook in there now. I mean, making treats would be fun in a dungeon but like actually cooking dinner?? It’s not bad now!
Miche
May 22, 2015 at 5:23 amThis is awesome! We’re finishing ours right now and I feel your joy of a bright kitchen. Love your blog by the way!! Xo
Bonnie
May 25, 2015 at 10:22 pmThanks Miche! Honestly, it’s my fave room in the house now. Good luck with yours!
Meal Time Logistics for Big Families
October 26, 2021 at 10:29 pm[…] that has streamlined meal time at our house is this long bar counter! You can read all about our kitchen remodel here (the before picture is just frightening – you’ve been warned!) but I knew that once that […]